Overclocking your monitor increases your refresh rate, which can ultimately improve the smoothness of your overall experience. Overclocking a monitor is simple to do, and in this article, we will cover how to overclock your monitor, as well as the benefits and risks that go along with it.
Yes, monitor overclocking is a thing. And unlike GPU or CPU overclocks, monitor overclocks are, in general, very stable. If your monitor can handle an overclock, it will run at a higher refresh rate.
For most people most of the time it’s not exactly an essential thing to do, but that doesn’t mean it’s not a neat trick or that you shouldn’t do it. Here’s what you need to know.
Overclocking Your Monitor: Risks
Before we get started with how to overclock your monitor, it’s best to understand the limitations our equipment can have and any unwanted risks that can come with overclocking. Before overclocking anything, it is best to check your warranty to see if doing this will void it. In some cases, it will. Overclocking won’t cause too much harm to your monitor, but if it isn’t covered, then be aware you are continuing at your own risk.
Overclocking the refresh rate on your monitor would rarely damage the internal hardware, but the capabilities of each monitor are different. High-end gaming monitors sometimes come with the option to overclock so be on the lookout for one of these when you consider a newer monitor if overclocking is something you wish to persist with.
The main risk with overclocking is reducing the lifespan of the monitor itself. It should only reduce the lifespan a short amount, but basically, an increase in the monitors refresh rate requires a faster current which will increase the energy output. This increase in energy will drain more power from your power supply and can create more heat internally, which can, of course, wear down components over time.
Overclocking Your Monitor: Benefits
Understanding the benefits is just understanding what a refresh rate is. Your monitors refresh rate is how many times per second the image is refreshed and often 60Hz is enough. But with higher-powered graphics cards comes higher frame rates. When your frame rate on your GPU is out of sync with your refresh rate (60Hz +120 FPS), you can get a screen tear resulting in a jittery experience. So, increasing your refresh rate to match as close as you can with your frame rate, you can eliminate some of this.
Steps to Overclocking your Monitor:
CRU – Custom Resolution Utility
This one is one of the older methods, and may not be compatible with all GPUs or integrated Intel graphics. It does, however, seem to work very well with AMD graphics. You can download it here and once installed it’s a straight forward process to change up your refresh rate.
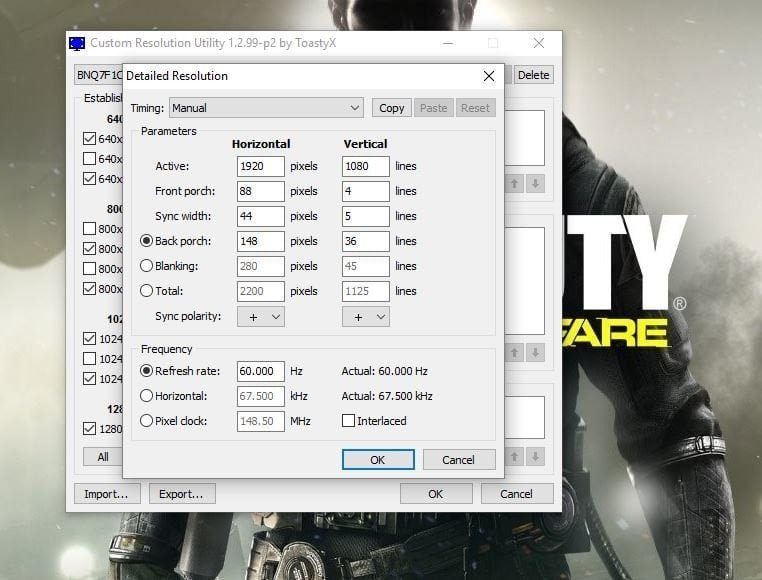
- Open CRU
- You’ll see two boxes, one for detailed resolutions and standard resolutions.
- Under detailed resolutions click add.
- Click on timing and change it to LCD standard.
- Change refresh rate to something above the standard value, a good start is an increment of 5Hz.
- Click OK.
- Reboot your PC.
Next you’ll need to change the refresh rate in Windows 10, steps which apply to any other method of overclocking.
- Right click on the desktop and select display settings.
- Click on advanced display settings.
- Scroll down and select display adapter properties.
- On the monitor tab select the desired refresh rate from the drop down box.
If it’s worked, the monitor won’t go black, basically. If you went too high the screen won’t display anything and will revert to old settings after 15 seconds.
Using AMD Radeon settings
If you’re using an AMD GPU you can achieve similar results using the AMD Radeon Settings application. Right click its icon in your taskbar and follow these steps.
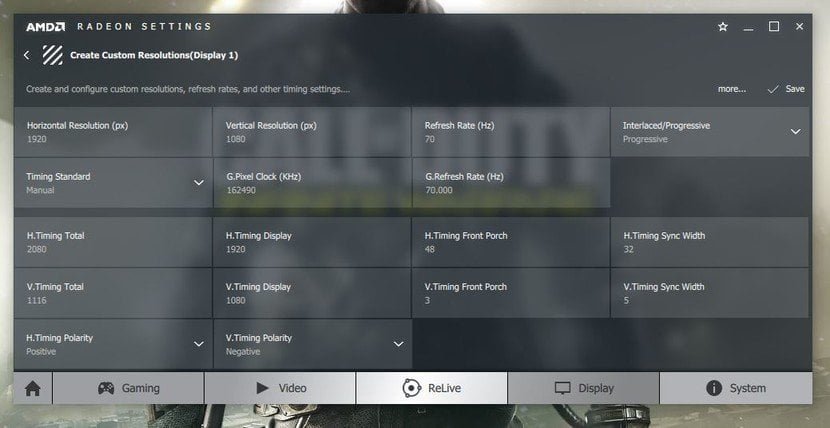
- Right-click on the desktop and select AMD Radeon settings.
- Click on the display tab.
- Next to custom resolutions, click create.
- Change the refresh rate to your desired level.
- Click save.
Reboot and use the steps above next to change to your custom refresh rate.
Using NVIDIA control panel
The steps for NVIDIA users are mostly similar as for AMD, with the main difference being NVIDIA’s controls look a bit more utilitarian!
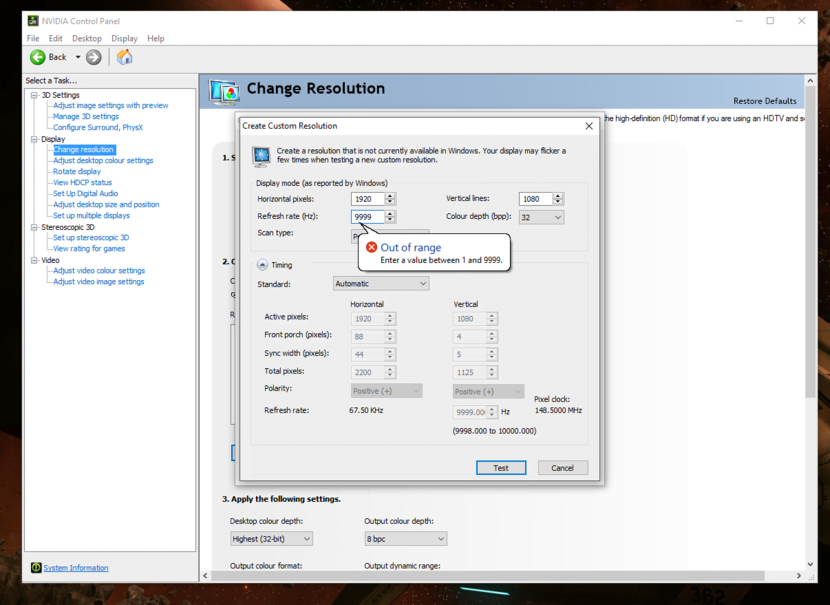
- Right-click on the desktop and select NVIDIA control panel.
- Expand the display menu.
- Click change resolution and then create custom resolution.
With the NVIDIA control panel you can test your created settings before applying. Once you’re happy, reboot and hit the steps above to implement.
Using Intel graphics
Intel’s own graphics control panel will also let you create custom resolutions and refresh rates fairly easily.
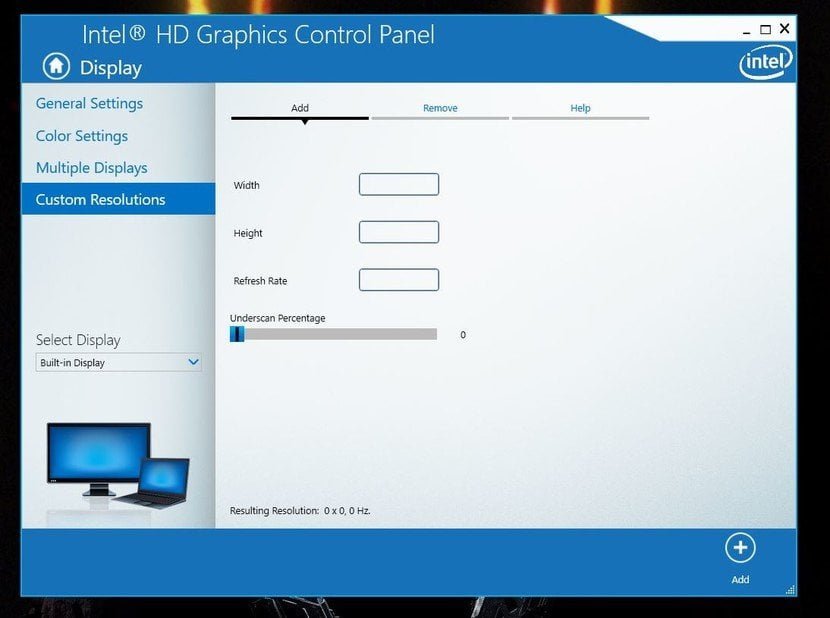
- Open Intel HD graphics control panel.
- Select display.
- On the left click on custom resolutions.
- Enter your width, height and desired refresh rate. 5 Click add.
If your display can’t go any higher, you’ll be prompted and will have to either quit or try again. If you get a successful lock-in, reboot and hit the steps above to make sure you’ve got the new one selected.
How to verify your overclock
To test and make sure that your new refresh rate is working as it’s supposed to, there’s a great online test that you can run. Visit http://www.testufo.com/#test=frameskipping in your browser and follow the steps on screen. It will recognize the refresh rate you’ve got selected for your monitor at that time.
What you basically do is take a photo of the moving graphic with a lower shutter speed and if everything is working as it should you’ll get a (poor quality) photo like the one above. If the shaded boxes are in a line and unbroken, then you’ve been successful. If the boxes are separated, then you’re getting skipped frames.
Conclusion
Just like overclocking a processor, all of this is done at your own risk. As with any overclocking, just be sure to take things slow. When you overclock your monitor, it can be tempting to go faster but that’s how things break. If you do it correctly, you’ll soon find you can enjoy an even better viewing experience than before.
